This page is where I will showcase my work and reflect on the art that I've shown
June 2018
|
June 2018
|
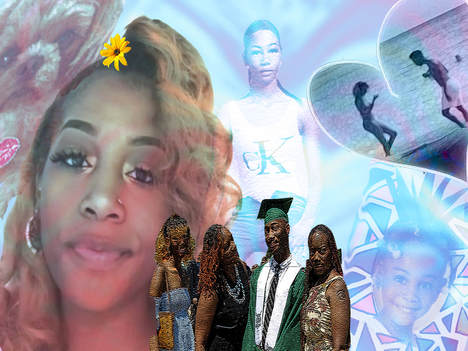
This project is called Digital selfie and what is presented is people that I love and myself. I used different unique tools to do this project. Like for example for blending modes I used Linear light which is an contrast. Then I used Lighter color which lightens the picture. Then I used different types of filters like water color and lowered the capacity. I added an flower to my had. I also added an painting that I did I added my head onto the painting. The assignment objective was to have 4 images to represent me and the final composition layer is made up of 6 or more layers, renamed. Next is photo quality, all the photos chosen including background layer are clear, appropriately sized, and different filters or modes. This also gave us an understanding on how we are going to do other projects with the tools that were used.
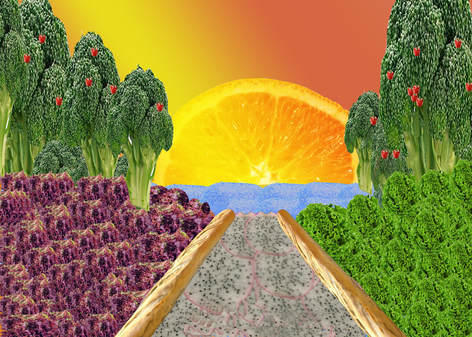
This project I accomplished was "The Food For Thought" and what we had to do was create a digital landscape made up of only fruits and vegetables. Which the landscape had to meet the following requirement for the elements and principles of art. For example I used overlapping which means I put the one of the trees in front of the purple cabbage. I also did the same thing for the orange and bread which is saturated in blue. Detail was a big important role in this project because It brings the picture together. I put red peppers on the trees which from far seem to look like berries on the tree. For my dragon fruit I used the blur tool and made it into a pathway with breadsticks on the outside. For that method I used transform which lead me to the perspective tool. Another element I used is color and value, for my orange further away appear lighter in value and cooler in color.
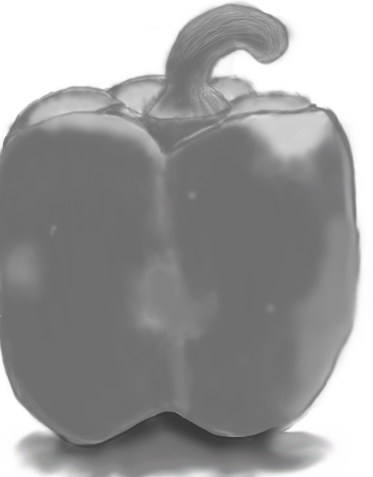
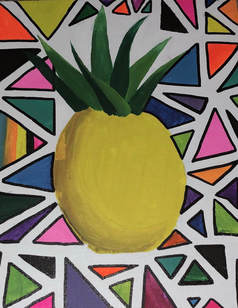
The assignment I accomplished is called "Paint By Layers" in grayscale. The point of this project is I will be able to digitally paint a straightforward in grayscale, using several layers and painting with the soft round brush and round brush. We had to pick one of your favorite fruit or vegetable and I chose an bell pepper. Next we had to put the picture into grayscale and open a new document. Then sketch out the picture on the new document. In order to achieve this we had to put it in several layers like drawing, underpainting, overpainting, and since I had a stem I had to put in another layer for that. Then to add texture on the stem I had to add another layer for that. Last but not least I had to add an shadow layer. One of my favorite parts is blending and shading the bell pepper.
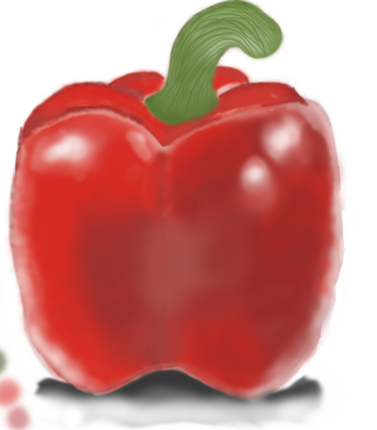
The assignment I accomplished is called "Paint By Layers" the color version. The point of this project was to be able to paint digitally in color that was on my picture that I selected which was an Bell Pepper. I sampled some colors from the bell pepper. Which were some reds, white, and gray. Next we had to do the same thing we did for grayscale but in color. In order to achieve this we had to put in several layers like drawing, underpainting, overpainting, and since I had a stem I had to put in another layer for that. Then my favorite part was the stem because I had to add my texture like I distributed lines throughout the stem and then added different variations of greens on it. Finally to add some finishes touches I added some white for highlight on the outside and on the apple
http://www.learninganimation.co.uk/strobe/make_a_phenakistoscope/process_phen_2.php?format=16
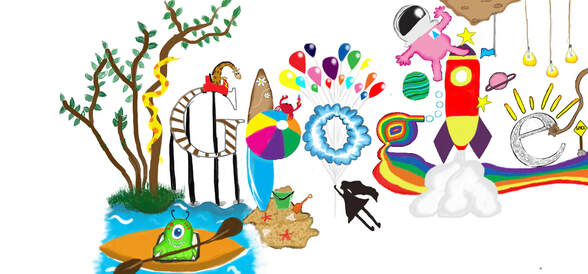
My theme was when I grow up I hope the world is filled with theme parks and space exploration. I believe there is another world out there in space somewhere but how else am I supposed to find out without space exploration. This Is why we need it. Humans are driven to explore the unknown and I feel like my future should have something to do with that. I drew several things to bring out my picture and too make it pop. For my G I did a Giraffe on a rollercoaster, for my O I did a beach ball, for my other O I did a cloud with balloons in the background, for my G I did a rainbow milky-way, for my L I did a spaceship and lastly for my E I did a light bulb because space is so bright.
The tools I used was I had to go into the filter gallery and then click sketch, and then stamp. Then I had to adjust the settings as needed with enough black and white pixels to define my image. Then I had to create a new layer underneath. Then add a noise gradient that I liked. Then I open the timeline and set it on frame animation. On my timeline I had to add 5 more layers, and then name the layers according to the color I chose and it has to be different colors and then my last layer is named black outlines.
For this project we had to create emoji of yourself and my emoji doesn't look like me at all but It has some characteristics that represents me like the crown on the emoji head. Which Is why I choose the crown to be animated. Also I gave the emoji some eye shadow between her eyes because that is how I do my makeup. I gave her a pink shirt because my favorite color is pink. Her eyebrows also represents me because they're so arched. I used several tools to accomplish this. I used the mixer brush tool and the smudge tool and used some different tones of brown to give her face some highlight so It will not be just one color. I say the lips was the best part about this and doing her hair. For her lips I was able to blend them and do it any color lipstick I want. For her hair I was able to do any style I want so I love the fact that I did Jet black hair with some type of wave. I feel like I did a good job at accomplishing this project.
The emoji project for celebrity was fun and different. We had to put are creative skills to the test. I think I did a great job at accomplishing it. We had to choose a celeb and make an emoji out of it. So I chose Ariana Grande because she is my spirit animal and I love everything about her. She is sweet and kind. Very intelligent and ambitious like me. The tools I used to create this Is frame animation. I used different blending modes like mixer brush and smudge tool. I used different shapes like a circle and oval in order to finish the eyes. I did a dark brown shading around her body and head to create a skin tone similar to Ariana Grande. For her Hair I used brown as the base and black lines to create definition in her hair and I blended the hair line out so I wouldn't look like I drew it . I also added a heart because she is very loved and sweet. I used the hand to make it seem like she was blowing a kiss. Overall this project was very fun.
